How to Distress Jeans in 5 Easy Steps
written by Thomas Starr
We’ve all heard it while wearing ripped jeans, the infamous line repeated by every boomer-aged man: “Did you buy your jeans like that?” Nowadays, the answer is more often than not a “yes,” with pre-distressed denim being sold by nearly every major fashion retailer. Distressed vintage denim is also incredibly popular, with fades and rips being highly valued by true vintage fans around the world. But while this wear and tear may be natural, it still wasn’t done by you, meaning the answer to the ever-annoying question is still a “yes,” meaning the boomer who asked you gets to follow up with a dumb quip about the younger generations. But what if the answer could be a “no,” without having to spend months, or even years, breaking in your jeans. Thankfully, distressing your own denim is incredibly easy and can be done in as little as 5 steps. After reading this guide, you’ll be able to go from a pair of pristine thrifted jeans to a beautifully worn-in and ripped pair, and stick it to the old folks who can't fathom wearing cool clothes.
Here’s what you’ll need: A pair of jeans (see Step 1), bleach, box cutter or knife, needle or safety pin, tweezers, sandpaper, chalk, seam ripper
Step 1: Sourcing Jeans
The somewhat obvious first step is obtaining your jeans to distress. If you already have a pair in mind then you can obviously skip this step, but if you’re starting completely empty handed then this part is key. Sourcing the wrong pair of jeans will make this process much less rewarding and you might end up putting in the work to get a pair of pants you don’t even want to wear.
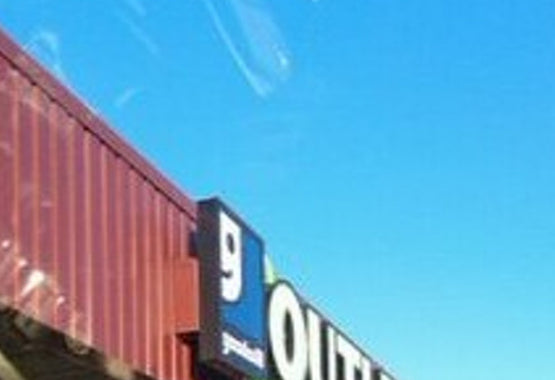
Being that this is “Thrift”Con University, we’re obviously gonna recommend that you thrift your jeans. Not only is this the cheapest option by far (perfect for a pair you’re going to rip up), but gives you a wide array of cuts, colors, and brands to choose from. Flea markets and vintage stores are also great places to check out, but are probably more expensive options, so if you’re on a budget then the thrift is the place to check. When you’re at your store of choice, make sure to look for 100% cotton denim. This will make your life much easier once you start distressing, as fading synthetic fabrics like polyester is much more difficult than fading cotton. Synthetic fabrics may also fray in undesirable ways, so if you’re after the classic Americana ripped jeans look, 100% cotton is the way to go. We went with a classic pair of dark wash Levi’s 501s from Goodwill. These are 100% cotton and a classic cut, meaning they’re perfect for distressing.

Step 2: Fading
The next step is to fade your denim before you start ripping it up. Denim-heads are crazy about fades, with people posting their best faded denim constantly. Jeans fade due to the way the indigo, which denim is dyed with, bonds to the cotton fibers that make up the fabric. Humans have been using indigo to dye clothing for thousands of years, but that doesn’t make it a good dye. In fact, indigo does not want to bond with cotton, with the dying process requiring the indigo to be broken down to the molecular level with other chemicals. Cotton yarn is then run through the resulting dye bath and then exposed to oxygen and light, which causes the indigo to oxidize and adhere to the thread in a weak outer layer of the yarn. This outer layer can easily wear off, exposing the white core of the yarn. That’s why your jeans will fade on the butt and knees before other places, those areas experience the most friction, wearing off the outer indigo layer.
While naturally fading your jeans takes forever (we’re talking years), you can get the indigo out of your pants more quickly in a few different ways. Firstly, and slightly more time consuming, is harnessing the power of the sun to fade your jeans. The sun, of course, will cause color to fade over time, meaning it can bleach your jeans if they’re left out for long enough. Simply leave your jeans outside in the sun for a few weeks, flipping them over every day, in order to fade the indigo. This method is definitely the least labor intensive, but also takes the longest. Another slightly long-winded method simply requires you to wash your jeans with hot water after every wear, as hot water will cause the indigo to break down and wash off the cotton fibers. Both of these methods definitely take longer, but will give you slightly more natural looking fades than the next method.
Lastly, you can fade your jeans much more quickly using a common household item: bleach. Simply mix bleach and water at a 1 cup to 1 gallon ratio in a large bucket or tub, then submerge your denim in the mixture. Let it soak for 30 minutes to an hour, checking every 5-10 minutes until you reach your desired fade level. Once that color is reached, remove your denim from the bleach mixture and immediately run them through the wash, with just water, in order to rinse the bleach out of them. You can also use a separate mixture of hydrogen peroxide and water, at the same ratio as before, to stop the bleaching. Once the wash is finished, air dry your jeans to prepare for the next step.
Here’s a before and after of our Levi’s, which we bleached for an hour.

Step 3: Planning Distressing
Now that your denim is faded to your liking, it’s time to get to work on the more fun part, ripping it up. But before you go ballistic on your jeans, you should use some fabric chalk to mark out where exactly you want your distressing to go. Just put the jeans on and draw lines where you think the cuts should go, it’s that simple. That way you don’t end up with what were supposed to be knee blowouts on your thighs.
Step 4: Doing the Damage
Now that you’re finally ready to cut and fray your jeans up, it’s time to decide just which methods you’re going to use. Luckily, there are quite a few options to choose from, with each giving slightly different results.
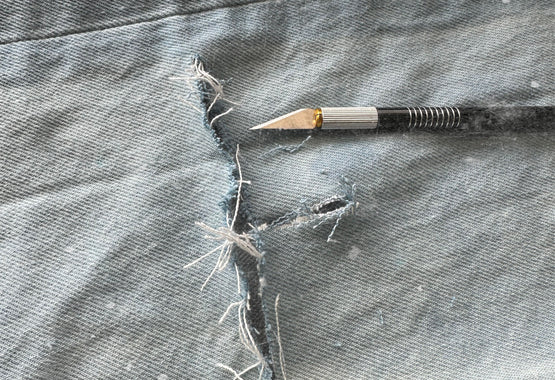
Firstly, there’s the ever-so-simple knife method, which is exactly as it sounds. Just use a hobby knife, razor, or even box-cutter to cut along the lines you drew with chalk. Be sure to place something like cardboard in the jeans though so you don’t accidentally cut through both layers. Once your jeans are sliced to your liking, run the edge of the knife along the edges of the cuts to fray them more and get a more natural look to your distressing. You should end up with something like this. Second, you can use a seam ripper to open up the hems on the bottom of the legs (if you didn’t cut them off), pockets, and waistband. For the legs, cut the thread holding the hem in place to extend the length of the leg by about half an inch. For the pockets and waistband, cut along the top of the hem and run the edge of your knife along it to give yourself more fraying for that worn in look.

Instead of using the edge of your knife to fray the edges, you can use sandpaper to get softer edges and bigger frayed threads. Just cut off a small square and rub it on the cut edges to fray them. Sandpaper can also be used to soften areas of your denim and even rip it. A coarse grit paper will work best and help keep your arm from getting tired. You can also use a razor to “shave” your denim, fraying it even further.
We went with a hobby knife, a seam ripper, and sandpaper to distress our pair of Levi’s. It took about 20 minutes total to do all this distressing, a whole lot less than the years of wear it would take naturally.
Step 5: One More Wash
After you finish cutting your jeans up, there’s one last step to achieve the perfect distressed pair of denim. Just throw them in the wash once more to allow the cut edges to fray more. Of course be sure to air dry them once they’re done so that they don’t get unwanted damage from the dryer. Once they’re dry, you’ll have a perfect pair of distressed jeans completely unique to you, ready to wear after just a few hours of work. Compared to the months to years it takes to naturally distress denim, this process really took no time at all. Here’s one last before and after of our pair, which we bleached, cut, seam-ripped, and frayed to make it look like they’ve been worn for years.